Below you will find what the program Jellyfish V.3.00 (level 7, using the bear off database) regards as the top 4 plays of each position and the analysis of "The Backgammon Handbook" author and accomplished Backgammon player Martin Fischer, translated and edited by yours truly. All the positions have been rolled out 12,000 times using Snowie pro and some have been hand rolled to be 100% sure of what is happening. In addition, the equity differences between the top 2 moves are large enough for there to be little doubt as to the order of the moves. Thanks to Michael Depreli for the first 4 positions. The positions in Jellyfish .pos format can be downloaded from my download page, should you wish to roll them out yourself.
![]() or scroll down for the first position
or scroll down for the first position
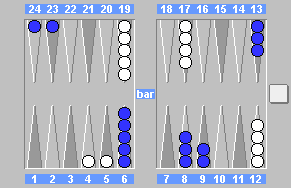
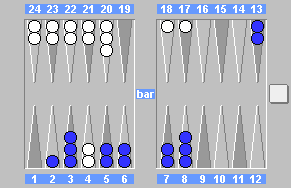
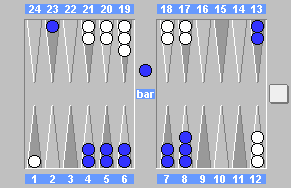
1) 3 point match. Match is even 0:0, Pip count: Blue 158 / White 155.
Blue to play 2-1?
|
Move |
Rkg. |
Equity |
Eq. Dif. |
| (a) 24/22 23/22 |
2. |
0.028 |
0.125 |
| (b) 23/21 6/5* |
3. |
0.027 |
0.126 |
| (c) 6/4* 6/5* |
1. |
0.150 |
0.000 |
| (d) 6/5* 5/3 |
4. |
0.017 |
0.133 |
The biggest problem with these kind of positions, is actually seeing the correct move. Here Blue starts 2 important
points and places 2 white checkers on the bar with 6/4* 6/5*. White has 21 return shots, however, only 4 rolls
hit 2 checkers. All other rolls give Blue an excellent chance to gain the initiative by building up his board.
Any other moves gives white the chance to do good things on his side of the board and to make the 5 point with
a 1. One of the most important factors early in a game is to fight for the initiative. ![]()
![]()
2) 5 point match. Match is even 0:0, Pipcount: Blue 88 / White 86.
Blue to play 5-2?
|
Move |
Rkg. |
Equity |
Eq. Dif. |
| (a) 20/13 |
1. |
-0.180 |
0.000 |
| (b) 6/1 6/4 |
2. |
-0.226 |
0.046 |
| (c) 6/1 4/2 |
4. |
-0.299 |
0.119 |
| (d) 6/1 5/3 |
3. |
-0.245 |
0.065 |
The race is close and could go either way here. Blue could play safe with 6/1 6/4, however, making this move would
waste 7 pips, this could be crucial in the long run. If blue waits now then he will be in the same dilemma next
roll, however White would probably have covered the blot in his home board and is likely to waste even more pips.
Another factor is any 6 by Blue and he is forced to give up the anchor anyway. Blue just does not have the timing
to play an effective holding game. Also of note is the duplication of 3s (3 to hit and 3 to cover) Half a point
if you spotted that :-) ![]()
![]()
3) 5 point match. Blue leads 2:0, Pipcount: Blue 124 / White 128.
Blue to play 5-2?
|
Move |
Rkg. | Equity | Eq. Dif. |
| (a) 6/1 4/2 |
2. |
-0.119 |
0.051 |
| (b) 18/13 18/16 |
3. |
-0.120 |
0.052 |
| (c) 13/8 13/11 |
1. |
-0.068 |
0.000 |
| (d) 6/1 3/1 |
4. |
-0.133 |
0.065 |
4) 5 point match. Match is even 0:0, Pipcount: Blue 152 / White 142.
Blue to play 2-1?
|
Move |
Rkg. | Equity | Eq. Dif. |
| (a) 13/11 6/5 |
1. |
0.041 |
0.000 |
| (b) 13/11 24/23 |
3. |
-0.033 |
0.074 |
| (c) 8/5 |
2. |
-0.023 |
0.064 |
| (d) 13/10 |
4. |
-0.045 |
0.086 |
5) 5 point match. Match is even 1:1, Pipcount: Blue 97 / White
92.
Blue to play 6-1?
|
Move |
Rkg. | Equity | Eq. Dif. |
| (a) 13/7 3/2 |
2. |
0.213 |
0.052 |
| (b) 13/7 13/12 |
4. |
0.192 |
0.073 |
| (c) 13/6 |
3. |
0.193 |
0.072 |
| (d) 8/2 3/2 |
1. |
0.265 |
0.000 |
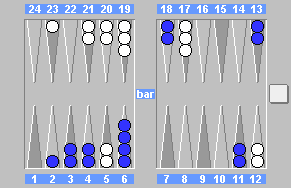
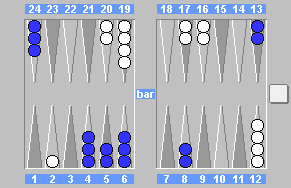
6) 5 point match. Blue trails 1:0, Pipcount: Blue 154 / White
143.
Blue to play 1-1?
|
Move |
Rkg. | Equity | Eq. Dif. |
| (a) 24/21 24/23 |
2. |
-0.206 |
0.067 |
| (b) 24/22 24/23 6/5 |
4. |
-0.231 |
0.092 |
| (c) 24/23(2) 4/2* |
3. |
-0.231 |
0.092 |
| (d) 24/22(2) |
1. |
-0.139 |
0.000 |
Something has to be done about having 3 checkers on the 1 point. You will notice that White is stripped (only 2
checkers) on the 17 and 16 points. It is possible to "freeze" those checkers, this means make them inactive
builders rather than active builders which they are at the moment. This makes life far more difficult for White
to build up his/her board with ease. You will notice all the top 4 plays do something with the back checkers. The
reason is because White is in an ideal position to make his bar, 4 or 3 point here, and with 3 men back Blue can't
afford to let that happen with impunity. ![]()
![]()
7) 5 point match. Match is even 0:0, Pipcount: Blue 101 / White
86.
Blue to play 6-1?
|
Move |
Rkg. | Equity | Eq. Dif. |
| (a) 11/5 6/5 |
1. |
-0.408 |
0.000 |
| (b) 8/2 3/2 |
3. |
-0.703 |
0.295 |
| (c) 13/6 |
2. |
-0.528 |
0.120 |
| (d) 8/2 8/7 |
4. |
-0.729 |
0.321 |
There are many players who are worried about 7 and 8 pip away indirect shots. They have read or through experience
are aware that 7 and 8 are the most common totals of a roll so therefore avoid leaving shots at that distance,
sometimes however there are overriding factors. There are only 2 plays really here, 13/6 or 11/5 6/5. 13/6 is safe,
but woefully unconstructive. 11/5 6/5 however makes the valuable 5 point making bearing in and off easier, the
benefits of which far outweigh the indirect 7 shot. The plays are not close at all. ![]()
![]()
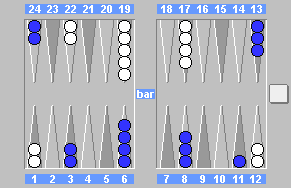
8) 5 point match. Blue leads 2:0, Pipcount: Blue 161 / White
150.
Blue to play 6-1?
|
Move |
Rkg. | Equity | Eq. Dif. |
| (a) 13/7 8/7 |
2. |
-0.215 |
0.138 |
| (b) 13/7 6/5* |
1. |
-0.077 |
0.000 |
| (c) 13/7 24/23 |
3. |
-0.240 |
0.163 |
| (d) 13/6 |
4. |
-0.244 |
0.167 |
The favoured move in this position takes some nerve. Especially if you are a beginner, you will find it rather
odd to leave such a loose position. It is only when you understand the tremendous value of your opponents and your
own 5 point, that there can only be 1 move here. If you do not hit, then should White make the 5 point next move
you become a serious underdog. The reason is White can take additional risks in building up his/her board in the
knowledge that he is virtually unprimeable and has a solid anchor to come out on. 13/7 provides an extra builder
and is pretty much forced. ![]()
![]()
9) 5 point match. Blue trails 2:0, Pipcount: Blue 86 / White 80.
Blue to play 3-1?

|
Move |
Rkg. | Equity | Eq. Dif. |
| (a) 10/9* 9/6 |
1. |
-0.009 |
0.000 |
| (b) 8/5 7/6 |
3. |
-0.159 |
0.150 |
| (c) 8/5 6/5 |
4. |
-0.190 |
0.181 |
| (d) 10/7 10/9* |
2. |
-0.092 |
0.083 |
10) 3 point match. Match is even 0:0, Pipcount: Blue 142 / White
129.
Blue to play 2-1 from the bar?
|
Move |
Rkg. | Equity | Eq. Dif. |
| (a) 25/24 8/6 |
3. |
-0.233 |
0.105 |
| (b) 25/23 8/7 |
2. |
-0.231 |
0.103 |
| (c) 25/22 |
1. |
-0.128 |
0.000 |
| (d) 25/24 13/11 |
4. |
-0.322 |
0.194 |
Disclaimer: The
answers to these positions are based on three separate evaluations. Jellyfish's standard evaluation at level 7,
12,000 Snowie rollouts and the study of the positions from a top drawer player. It is unlikely that any of these
answers are wrong but cannot be ruled out as until someone or a program masters the game of backgammon then all
positions in theory are debatable. If you are adamant that a position wrong then let me know and I'll check it
out. You might also want to open it up for discussion, this can easily be done by using my Guestbook as a sounding
board or perhaps download
the position(s) and roll them out for yourself (Jellyfish Analyser required).
Should thee fail to sign my Guestbook, then thee shall be
cursed by rolling 5-1 forever more...
![]()
BG Home ~ Links ~ Quiz ~ Download ~ Webby's Homepage ~ Credits ~ E-Mail